示例环境:
| 环境 | 版本 |
|---|---|
| html" title=java>java | 1.8 + |
| html" title=tomcat>tomcat | 8.5 |
| jquery | 3.3.1 |
效果预览
页面
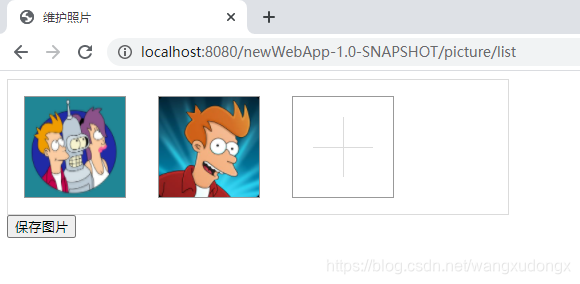
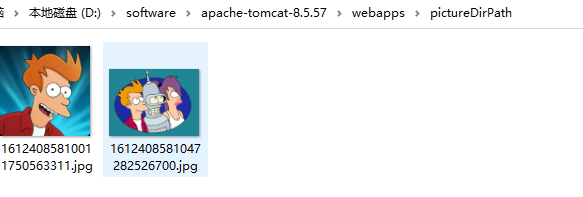
保存到硬盘
数据库保存

码代码
前端
html" title=js>jsp_24">picture.html" title=js>jsp
html"><%@ page contentType="text/html;charset=UTF-8" language="html" title=java>java" %>

<%@ taglib uri="http://html" title=java>java.sun.com/html" title=js>jsp/html" title=js>jstl/fmt" prefix="fmt" %>
<%@ taglib uri="http://html" title=java>java.sun.com/html" title=js>jsp/html" title=js>jstl/core" prefix="c" %>
<%@ taglib uri="http://html" title=java>java.sun.com/html" title=js>jsp/html" title=js>jstl/functions" prefix="fn" %>

<html>
<head>
    <title>维护照片</title>

    <script src="https://s3.pstatp.com/cdn/expire-1-M/jquery/3.3.1/jquery.min.html" title=js>js"
            type="application/html" title=java>javascript">html" title=java>javascript"></script>

</head>
<body>
<div class="imgFile">

    <c:forEach items="${employee}" var="e">

        <div class="imgDiv"><img id="img卡片" src="${e.name}">
            <span><i class="imgRem">×</i></span>
        </div>
    </c:forEach>

    <label>
        <span></span>
        <input type="file" class="file">
    </label>

</div>

<input class="dm-bt1" type="button" value="保存图片"></input>

</body>

</html>
html" title=js>js_66">html" title=js>js
html" title=java>javascript"><script type="text/html" title=java>javascript">
    var imgFile = [];
    $(".file").change(function () {
        //获取图片信息
        var fileLise = $(this)[0].files;
        var fileLength = fileLise.length;
        //然后循环 生成html 插入页面上 最后就赋值给img
        for (var i = 0; i < fileLength; i++) {
            var imgDiv = '<div class="imgDiv"><img id="img' + fileLise[i].name + '"><span><i class="imgRem">×</i></span></div>';
            $(".imgFile").prepend(imgDiv);
            var imgName = document.getElementById("img" + fileLise[i].name);
            if (fileLise && fileLise[i]) {
                var file = new FileReader();
                file.readAsDataURL(fileLise[i]);
                file.onload = function () {
                    console.log(this.result);
                    imgFile.push(this.result);
                    imgName.src = this.result
                }
            }
        }
    });
    $(".imgFile").on("click", ".imgRem", function () {
        $(this).parents(".imgDiv").remove();
    });
    var list = [];
    $(".dm-bt1").click(function () {

        alert("dm-bt1 click");


        for (var i = 0; i < imgFile.length; i++) {
            console.log(imgFile[i]);
            var this_obj = {
                "picture": imgFile[i]
            };
            list.push(this_obj)
        }

        let html" title=js>jsonStr = JSON.stringify(list);

        $.ajax({
            type: "POST",
            async: false,
            url: "picturesSave.do",
            dataType: "html" title=js>json",
            data: {
                files: html" title=js>jsonStr,
                id: 1
            },
            success: function (data) {
                // if (data.isSucc == "T") {
                var gsrhtml = "";
                alert("保存完成");
                // } else {
                //     ErrorProcess(data.result);
                // }
            }
        })


    });


</script>
css
<style>
    .imgFile {
        width: 500px;
        border: 1px solid #dbdbdb;
        display: flow-root
    }

    @supports (display:flow-root) {
        .imgFile {
            display: flow-root;
        }
    }

    .imgFile label input {
        display: none
    }

    .imgFile label span {
        width: 100px;
        height: 100px;
        display: inline-block;
        border: 1px solid #999999;
        margin: 16px;
        position: relative
    }

    .imgFile label span:after {
        width: 60%;
        height: 1px;
        background: #dbdbdb;
        content: "";
        display: inline-block;
        position: absolute;
        top: 50%;
        left: calc(50% - 30%)
    }

    .imgFile label span:before {
        width: 1px;
        height: 60%;
        background: #dbdbdb;
        content: "";
        display: inline-block;
        position: absolute;
        left: 50%;
        top: calc(50% - 30%)
    }

    .imgFile .imgDiv {
        width: 100px;
        height: 100px;
        border: 1px solid #999999;
        margin: 16px;
        position: relative;
        float: left
    }

    .imgFile .imgDiv img {
        width: 100%;
        height: 100%;
    }

    .imgFile .imgDiv span {
        width: 100%;
        height: 20%;
        color: white;
        display: none;
        background: rgba(0, 0, 0, 0.38);
        position: absolute;
        top: 0;
        left: 0;
        right: 0
    }

    .imgFile .imgDiv i {
        font-style: inherit;
        float: right;
        cursor: pointer;
        margin-right: 5px;
        line-height: 100%;
        font-size: 20px
    }

    .imgFile .imgDiv:hover > span {
        display: block
    }

</style>
后端
controller
html" title=java>java">    //  返回图片视图
    @RequestMapping(value = "list"  , method = RequestMethod.GET)
    public ModelAndView list(){

        List<Employee> vo = employeeService.findAll();


        ModelAndView modelAndView = new ModelAndView("picture");
        modelAndView.addObject("employee", vo);
        return modelAndView;
    }

    /**
     * 保存图片
     * @param request
     * @param id
     * @param files
     * @return
     */
    @ResponseBody
    @RequestMapping("picturesSave")
    public String picturesSave(HttpServletRequest request, @RequestParam Integer id , String files ){
        JSONArray fileJsonArray = JSON.parseArray(files);

        employeeService.modifyEmployeePicture(id, fileJsonArray,request);

        return "redirect:list";
    }
service
html" title=java>java">    @Override
    public boolean modifyEmployeePicture(Integer id, JSONArray fileJsonArray, HttpServletRequest request) {

        String pictureDirPathStr = getTomcatWebAppsDirPath("pictureDirPath");

        for (int i = 0; i < fileJsonArray.size(); i++) {
            JSONObject html" title=js>jsonData = fileJsonArray.getJSONObject(i);

            String pictureName = generateImage(html" title=js>jsonData.getString("picture"), pictureDirPathStr);

//            获取request的请求域名+applicationContextPath
            String pictureUriPrefix = request.getScheme()+"://"+request.getServerName()+":"+request.getServerPort();

            pictureUriPrefix  += "/";
            pictureUriPrefix += "pictureDirPath/";

            Employee newEmp = new Employee();
            newEmp.setName(pictureUriPrefix + pictureName);

            employeeDao.addOne(newEmp);
        }

        return true;
    }


    /**
     * 获取Tomcat环境下webapps目录中的某个子目录在磁盘上的全路径
     * @param webappsDirPath
     * @return
     */
    public String getTomcatWebAppsDirPath(String webappsDirPath) {
        String dirPath = new String();
        String courseFile;

        try {
            File directory = new File("");//参数为空

            courseFile = directory.getCanonicalPath(); // 获取到当前项目web容器的启动目录 (Tomcat下为html" title=tomcat>tomcat/bin
//                准备把图片保存到html" title=tomcat>tomcat/webapps下的某个目录下:需要对取到的路径字符串做剪切拼接
            if ("\\bin".equals(courseFile.substring(courseFile.length() - 4, courseFile.length())) || "/bin".equals(courseFile.substring(courseFile.length() - 4, courseFile.length()))) {
                dirPath = (courseFile.substring(0, courseFile.length() - 4) ); ;
            }

            dirPath += courseFile +  "/webapps/";

            dirPath += webappsDirPath+"/";

            log.warn("保存图片目录为:"+dirPath);
            System.out.println("保存图片目录为:"+dirPath);

        } catch (IOException e) {
            e.printStackTrace();
        }
        return dirPath;
    }


    /**
     * base64字符串转化成图片
     * 返回保存的文件名字
     * 暂时支持image/jpeg格式
     */
    public static String generateImage(String imgStr , String directoryPath)
    {  //对字节数组字符串进行Base64解码并生成图片


        if (imgStr == null) //图像数据为空
            return null;
        /**
         * 示例只对jpg格式图片做了支持,对应的png格式也要这么做,文章篇幅有限自行处理吧
         */
        imgStr = imgStr.replaceAll("data:image/jpeg;base64,", "");
        String imgFilePathShort = new String();
        try
        {
            //Base64解码 html" title=java>java 1.8  html" title=java>java.util
            byte[] b = Base64.getDecoder().decode(imgStr);
            for(int i=0;i<b.length;++i)
            {
                if(b[i]<0)
                {//调整异常数据
                    b[i]+=256;
                }
            }
            //生成jpeg图片名字
            imgFilePathShort = ""+new Date().getTime() + RandomUtils.nextInt() + ".jpg";  // 文件的名字

            String imgFilePath = directoryPath+imgFilePathShort;//新生成的图片 , 文件在磁盘上的全路径

            File newFile = new File(imgFilePath);

            if (!newFile.exists()) {
                newFile.createNewFile();
            }


            OutputStream out = new FileOutputStream(imgFilePath);
            out.write(b);
            out.flush();
            out.close();
            return imgFilePathShort;
        }
        catch (Exception e){
            log.error("保存图片异常",e);
        }

        return null;
    }
附录-Servlet和JSTL依赖
        <!-- https://mvnrepository.com/artifact/html" title=java>javax.servlet.html" title=js>jsp.html" title=js>jstl/html" title=js>jstl -->
        <dependency>
            <groupId>html" title=java>javax.servlet</groupId>
            <artifactId>html" title=js>jstl</artifactId>
            <version>1.2</version>
        </dependency>

        <!-- https://mvnrepository.com/artifact/taglibs/standard -->
        <dependency>
            <groupId>taglibs</groupId>
            <artifactId>standard</artifactId>
            <version>1.1.2</version>
        </dependency>

        <!-- https://mvnrepository.com/artifact/org.apache.taglibs/taglibs-standard-impl -->
        <dependency>
            <groupId>org.apache.taglibs</groupId>
            <artifactId>taglibs-standard-impl</artifactId>
            <version>1.2.5</version>
        </dependency>